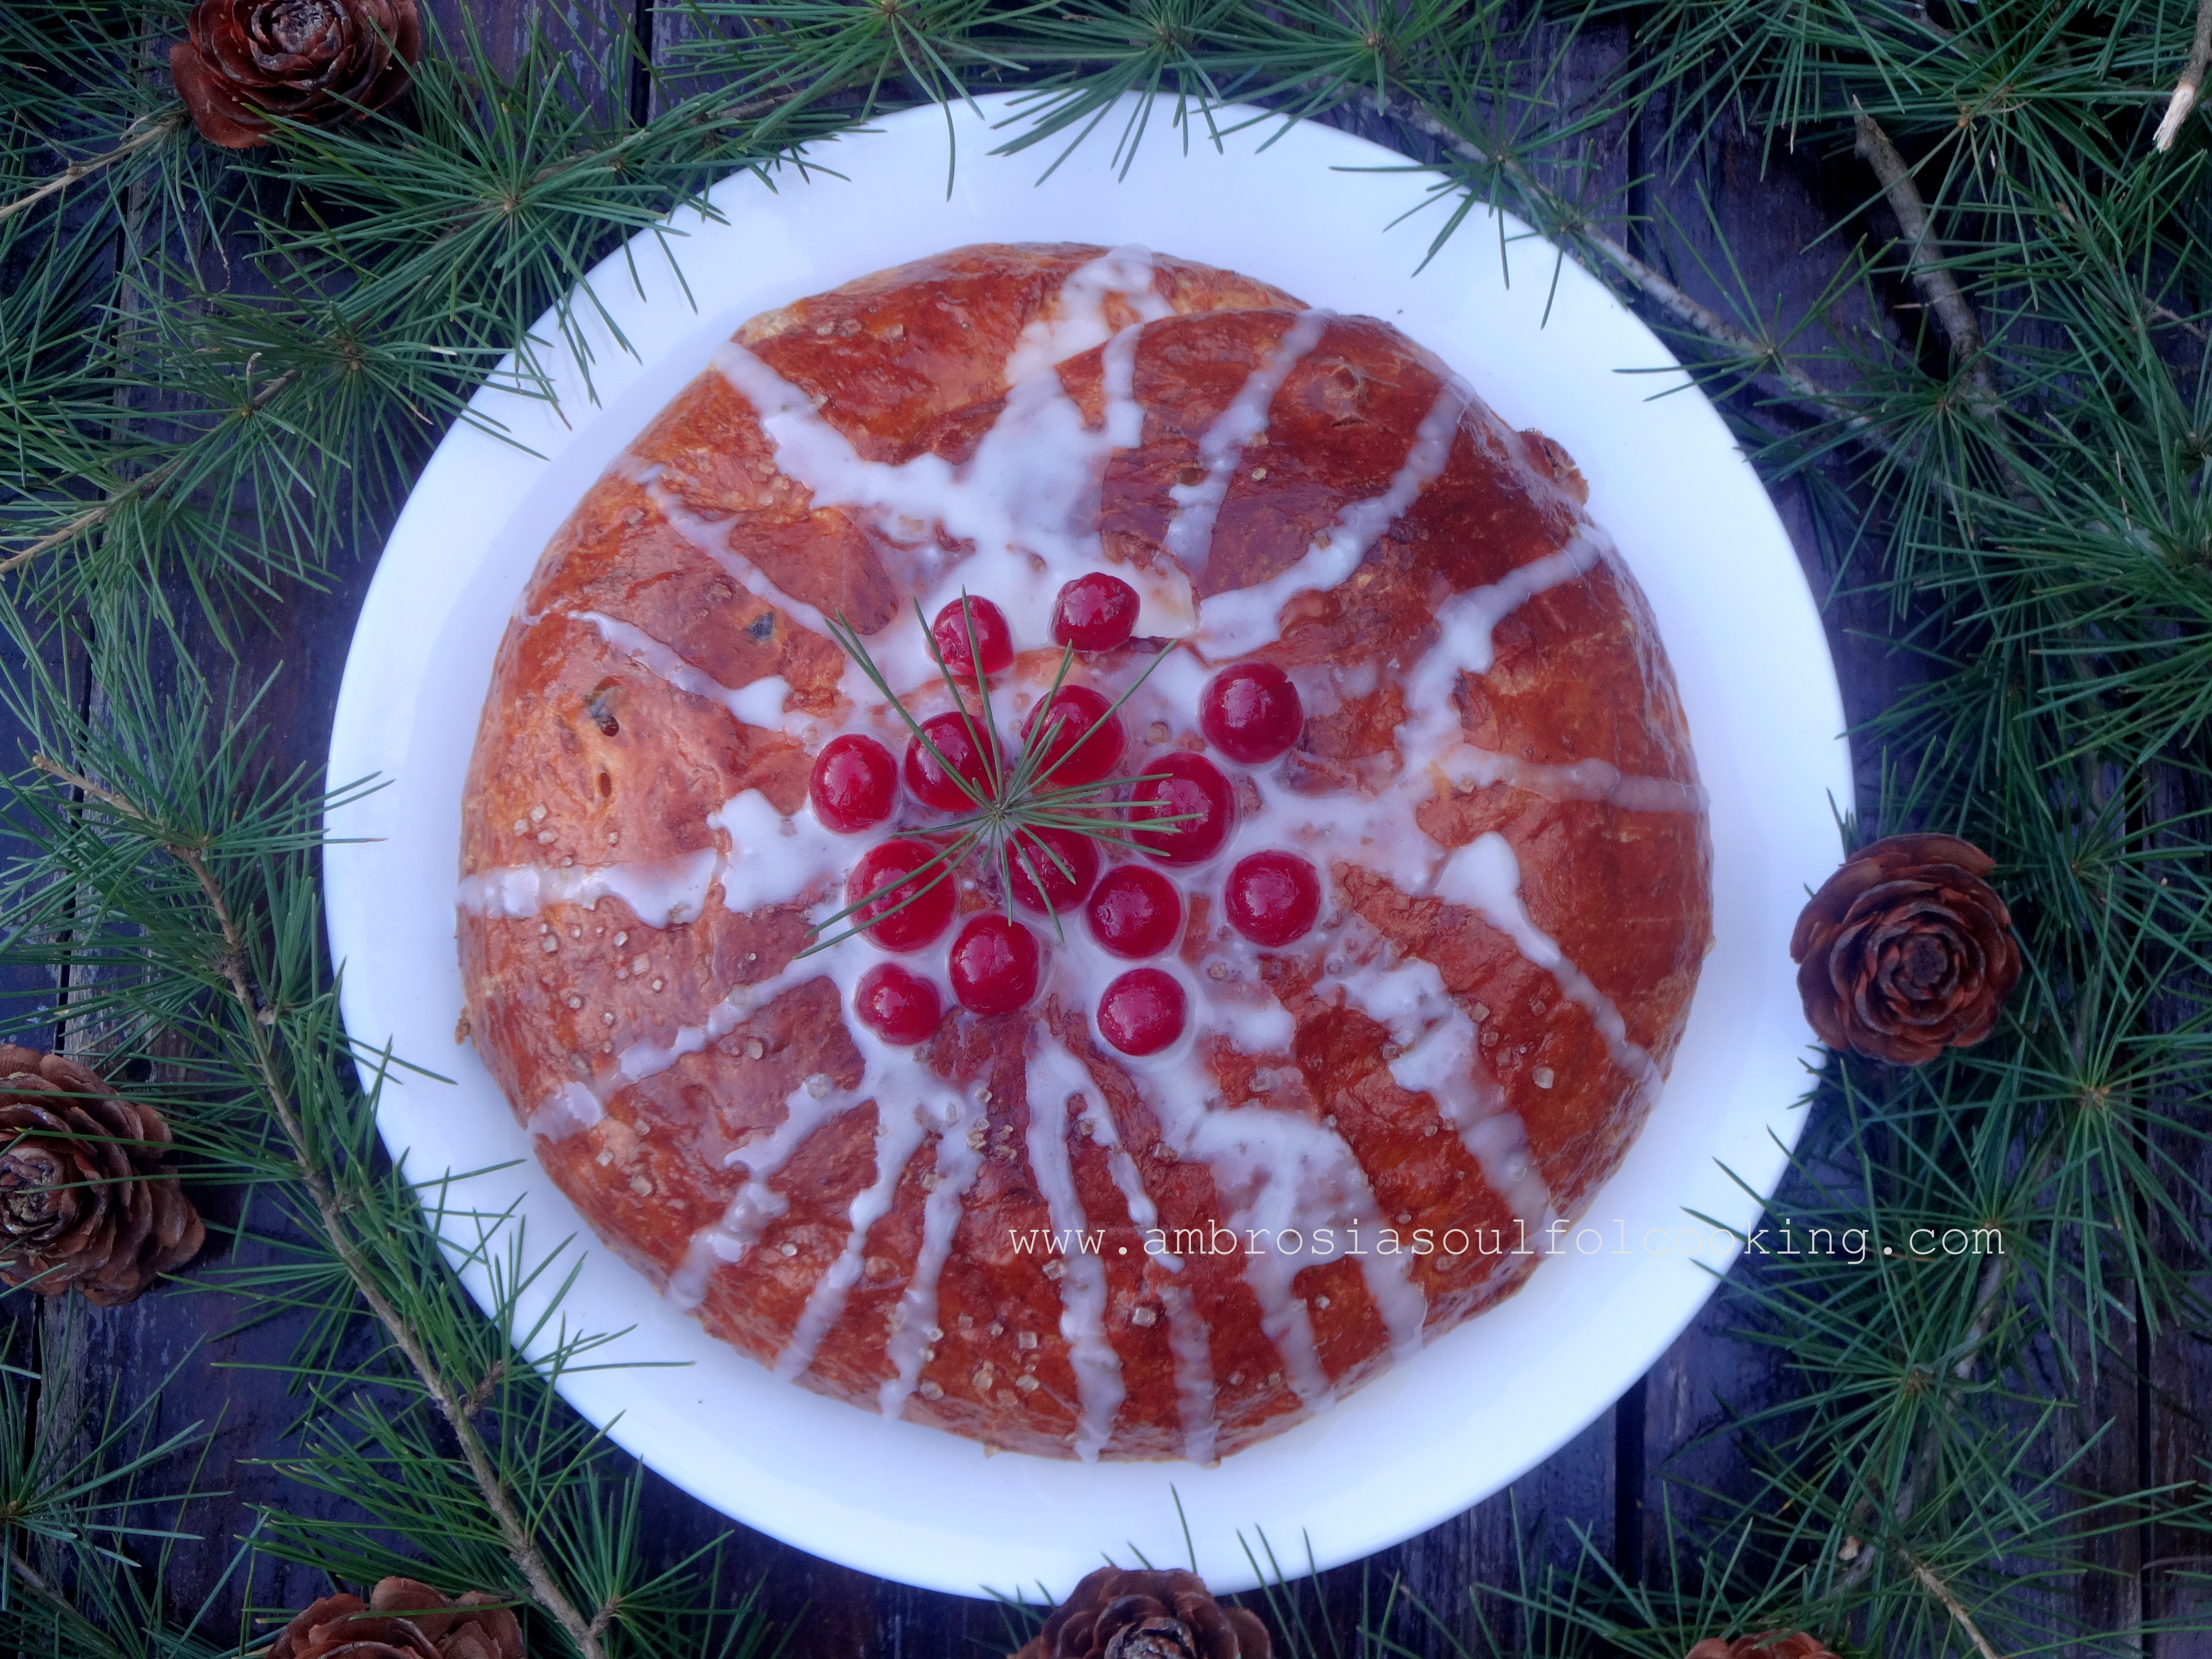
Rosemary Dinner Rolls are soft, pillowy and delicious. You'll love to dunk them into your soup or soak up your favourite gravy. The rolls taste great with butter.


It has been a snowless winter. Almost dry, except for the heavy hailstorm that battered the hills last week. The buds of the summer fruits were beginning to open up and the heavy hail caused colossal damage to the orchards. Since we are in the cooler area, the fruit trees had not started bearing buds and luckily escaped the wrath of the storm.


Our orchards are beginning to bloom now and trees are wearing new leaves. Peach and Plum blossoms present a stunning contrast. 


Spring is magical. Rhododendrons are painting the hills red. A walk in the forest is calming for the mind and soothing for the soul.

Last week we baked Rosemary Dinner Rolls. Our home smelt divine as the spiral Rosemary rolls baked. 


Soft, pillowy and flavourful, the rolls made a great accompaniment to Pumpkin soup.


You may add minced garlic if you wish. Add lots of chopped rosemary to the dough. The rolls taste best when fresh and warm. Enjoy with hot soup. 


Rosemary Dinner Rolls

Ingredients

  • 3 cups bread flour/all-purpose flour / whole wheat flour
  • 1 teaspoon salt
  • 1 tablespoon finely chopped fresh Rosemary 
  • 6-7 cloves garlic minced (optional)
  • 2 tablespoons sugar
  • 2 teaspoons instant dry yeast
  • ½ cup warm water
  • 2/3 cup warm milk
  • 1/3 cup oil

Instructions

  1. In a large bowl, mix flour and salt. Whisk well. Add 2 teaspoons chopped Rosemary and minced garlic.
  2. In another bowl, take warm water, and add milk and sugar. Mix until sugar dissolves. Now add yeast. Mix and let sit for 10 minutes. The yeast will get activated.
  3. Add the liquid ingredients to flour and knead for 3- 4 minutes until the dough turns soft. Now add oil and knead until the oil is well incorporated and the dough becomes soft and supple.
  4. Transfer to an oiled bowl and turn around so that it is evenly coated with oil. Cover and keep in a warm place until double, about 1 hour.
  5. Punch down dough. Transfer to a lightly floured surface and divide into 12-14 pieces.
  6. Roll each piece into a 12-inch rope. Starting at one end, wrap the dough around itself to form a coil. Tuck under and pinch to seal.
  7. Arrange the shaped roll on a baking tray lined with parchment paper. Place the rolls 2 inches apart.
  8. Cover and let it rise for 25- 30 minutes or until double.
  9. Preheat the oven to 180 degrees C.
  10. Brush the top of the rolls with milk. Sprinkle remaining Rosemary.
  11. Bake for 20-25 minutes or until golden.
  12. Cool on the wire rack. Serve warm.


 Note: you may require more water if using whole-wheat flour


Linking to #BreadBakers


Check out some amazing Easter Breads here-


 Amazingly soft Whole Wheat Sandwich Bread that has a great crumb and is delicious. . Autolyse does the magic. The dough becomes soft and pliable. the crumb is super soft. The bread toasts well.


The branches of Pear trees are bare. Trees are shedding leaves before time. This could be due to a long wet period of rain and temperature drop or due to reasons incomprehensible but definitely some connection to global warming. Raindrops sitting on the bare branches shine like jewels as the first rays of the Sun fall on them. A bird perches on the branch and the drops fall off in unison. There are dew drops on the grass that too shine like diamonds.


The floor of the forest is mossy and wet and dotted with mushrooms of vivid colours.


The bushes of Pyracantha, also called Himalayan Firethorn are laden with fruit. We often spot birds feasting on them.

The timer of the oven rings and a yeasty aroma permeates through as the bread bakes.

We have baked a Whole Wheat Sandwich bread that tastes lovely and has a great crumb.

Our dinner is sorted. We shall have stewed veggies with bread. This is whole wheat bread with six hours of autolyse.  Autolyse really helps baking a soft loaf especially when baking with whole grains. From a shaggy unmanageable dough, it becomes a soft, pliable dough that rises well. This bread goes through a single rise.

A few important things to be kept in mind are-

  • Depending on the kind of whole wheat flour you are using, water requirements could vary. 
  • Start with 1 ¼ cup. Add more only if there are dry pockets of flour.
  • Dissolve yeast in 3-4 teaspoons of water. This will increase the hydration levels of the dough.
  • The final dough may be too wet to shape. Just pour it into a greased pan liberally dusted with flour.
  • Do not add more flour if the dough is wet. The dough will be very sticky but not runny.


The bread has a soft crumb. It rises well and has a good oven spring.

This bread has two cups of Whole Wheat Flour and one cup of All-Purpose flour.

If you wish to bake 100% Whole Wheat Bread and know more   about autolyse, read here-   100%Whole Wheat Bread (Autolyse Method)


AUTOLYSE

Autolyse is a technique that is easily introduced into your bread-baking routine and delivers a dough that is easier to work with and shape and gives a loaf better in texture, rise and flavour. It is a deceptively simple process. Just combine flour and water in a bowl and mix until no dry flour remains. Simply cover the bowl and leave it in a warm place for 20-30 minutes to up to  3 hours.

During the resting stage, gluten development begins and simple sugars start to form as starch is broken down. The dough becomes smoother, elastic and easier to handle.

Autolyse is a resting period between mixing and kneading.


Whole Wheat Sandwich Bread (Vegan)

Ingredients

  • 2 cups whole wheat flour
  • 1 cup all-purpose flour
  • 1 ½  cups water (room temperature)
  • 2 teaspoons instant dry yeast
  • 4 teaspoons of unrefined sugar
  • 1 teaspoon salt
  • 1 tablespoon oil

Instructions

  1. Mix whole wheat flour and all-purpose flour in a large deep bowl.
  2. Add 1 cup water. Mix. Add ¼ cup water more if the dough is too hard.
  3. Mix till there are no dry pockets. The dough will be tight and hard. Cover and keep for 6 hours or overnight (in the refrigerator) .
  4. After the resting period, the dough will be very soft, supple and elastic.
  5. Dissolve yeast in 2-3 teaspoons of water. Add to dough. Add salt and sugar.
  6. Now mix very well. It will take some time to mix and for all the ingredients to incorporate well.
  7. Once done, add oil and again you will require some time to mix and get a soft, pliable and supple dough.
  8. Even if the dough gets a little wet, it is ok.
  9. Grease and dust one 8 ½ inch x 4 ½ inches loaf pan.
  10. Shape the dough into a loaf. If it is too wet, don’t shape it, just pour it into the pan and with greased hands, level the top.
  11. Keep in a warm place to rise until almost double.
  12. Preheat the oven to 180 degrees C.
  13. Bake for 25 to 35 minutes or until the top turns golden.
  14. Remove from the pan and cool in the rack.
  15. Slice when cold.


 Earthy, nutty and healthy, the crackers have Oats, Flaxseeds, Finger millets and Almonds. Very delicate, crisp and delicious the crackers are high in whole grain flours and high fibre ground flaxseed..


We wake up to the thunderous roar of clouds, looming over the sky like a monster. Soon the rain falls, thick and heavy, creating different music on different surfaces. The mist rolls down the hills covering the forests, and the trees in a blanket of white.


Rains, mist, fog and cold have become a norm. There is always a constant murmur of streams that are born of monsoon that came early and has overstayed. The forest floor is a carpet of moss and ferns.  Sunny days seem a rarity.

And mushrooms of all shades and shapes have sprouted all around.


Some red.


Some Purple.

Rains in the hills also cause the temperature to drop. Unending cups of tea and herbal infusions are gulped down to face the cold and clammy weather. Evening cuppa feels incomplete until there is something to munch along and to satiate tiny hunger pangs.


A box of crackers has been baked as an accompaniment to tea. Earthy, nutty and healthy, the crackers have Oats, Flaxseeds, Finger millets and Almonds. Very delicate, crisp and delicious the crackers are high in whole grain flours and high fibre ground flaxseed..


The crackers make a great evening snack. Enjoy plain or with a dip. Take them on journeys or pack them in tiffin, the crackers make a healthy indulgence.


Oat Flaxseed and Ragi Crackers (Gluten Free and Vegan)

Ingredients

  • ¾ cup powdered oats
  • ¼ cup flax meal (powdered flaxseeds)
  • ¼ cup ragi flour (finger millet flour)
  • ¼ cup ground almonds
  • 2 tablespoons coconut oil
  • 1 ½ teaspoons unrefined cane sugar
  • ½ teaspoon salt
  • ¼ cup plus 2 tablespoons water

Instructions

  • In a large bowl, mix all the flours.
  • Add salt, sugar and coconut oil and mix well.
  • Add ¼ cup water and bring the dough together. Add 2 tablespoons of water and knead until the dough is soft and smooth. Cover and keep aside for 20 minutes.
  • Preheat oven to 160 degrees C.
  • Place the dough between two sheets of parchment paper.
  • Spread dough evenly with your hands. Roll out evenly with a rolling pin.
  • Cut crackers with a sharp knife or pizza cutter.
  • Bake for 20 to 25 minutes or until the crackers turn slightly brown at the edges.
  • Since the dough is brown, keep an eye during the last stages of baking.
  • Cool and store in an airtight container.


 Linking to # Bread Bakers


#BreadBakers is a group of bread-loving bakers who get together once a month to bake bread with a common ingredient or theme. Follow our Pinterest board right here. Links are also updated each month on this home page.


We take turns hosting each month and choosing the theme/ingredient.

Our theme this month is Gluten Free Breads


Coconut Banana Zucchini Bread from A Day in the Life on the Farm

Gluten-Free Oat Crackers from Ambrosia

Gluten-Free Sourdough Bread from A Messy Kitchen

Keto Coconut Flour Bread from Sneha’s Recipe

Oatmeal Raisin Gluten-free Quick Bread from Food Lust People Love

Rice and Almond Thin Crackers with Sea Salt from Karen’s Kitchen Stories


Onion  Garlic loaf has delicious flavours of onion and garlic. Every bite has the crunch of onions in the loaf.  It tastes amazing with a little butter. 


 Spring has arrived and colours of nature are showing up in the hues of flowers, in the greenness of the vegetation that had turned brown during the long cold winters. Days are beginning to get longer and sunnier. The warmth of the winter Sun is a treat. It is soothing healing and feels like a warm hug.


The buds in the fruit trees are opening up to lovely flowers. The white of the Plum, the pink of the peaches and the light pink of the Apricot is so mesmerizing.


Our forests are flaming with red Rhododendrons.   Forest pathways are lined with delicate flowers strewn on the path. It is like a celebration of colours.


Birds that migrated to the warmer climes are back. A Verditer flycatcher has repeatedly been visiting a corner of our roof. Perhaps it is looking for a nesting site.


Warm weather calls for baking bread. And we baked Onion Garlic Loaf. This loaf is full of onions and definitely a treat for onion lovers. The loaf has fried onions as well as chopped raw onions. A lot of garlic had been added for extra flavour. The favours in the bread are lovely and a little butter on the slice makes it a delicious snack. This is a vegan loaf. You may swipe half cup of water with milk to get a soft crumb.


Onion Garlic Loaf (Vegan)

Ingredients

  • 4 cups all-purpose flour
  • 1 tablespoon sugar
  • 2 ¼ teaspoons instant dry yeast
  • 1  teaspoon Himalayan pink salt
  • 1 ½ onion chopped finely
  • 3-4 cloves minced garlic
  • 2-3 tablespoons oil
  • 1 ½ cups warm water


Instructions

  1. Heat oil in a pan. Add 1 chopped onion. Fry until translucent. Add minced garlic. Turn off the heat
  2. In a large bowl, take water and sugar. Stir to dissolve. Add yeast. Stir and let sit for 10  minutes. It will become frothy.
  3. In another bowl, take flour, salt, yeasty water, and fried onions with all the oil. Add remaining raw onion.
  4. Knead for 6 to 7 minutes. Adjust the water to get a smooth dough.
  5. Transfer to an oiled bowl. Cover and keep in a warm corner for 1 hour or until double.
  6. Punch dough. Roll out the dough into a rectangle. Beginning at the short end, roll up tightly.
  7. Pinch seams and ends to seal. Place the loaf in the greased tin (8 inches x4 ½ inches) with seam sides down.
  8. Cover and leave to rise in a warm place for one hour or until double.
  9. Bake in a preheated oven at 180 degrees C for 25 to 30 minutes or till the top turns golden and the bottom sounds hollow when tapped.
  10. Remove from the oven and cool on the rack.

Linking to #BreadBakers

#BreadBakers is a group of bread-loving bakers who get together once a month to bake bread with a common ingredient or theme. You can see all our lovely bread by following our Pinterest board

We take turns hosting each month and choosing the theme/ingredient. 

Our theme is the allium family with includes onions, garlic, and leeks. Many thanks to our host, Karen of Karen’s Kitchen Stories! Check out the list of lovely breads below - 


 Julekage has a lovely buttery crumb studded with candied peels, raisins and currants. The crust is sweet and a slice of Julekage pairs beautifully with a cup of hot coffee.


The air is crisp and cold. Moon peeps from behind the hill across and in no time rises up. It looks like a huge buttery ball. A thousand stars blink in the sky.


Morning is clear, bright and cold. There is frost on the leaves and grass. Chilly winds blow. Birds are huddled together in trees. Winter has arrived. Days are warm and the Sun is mellow and comforting. A great Barbet perches on the sides of the bird bath and drinks to its heart's content.


A group of Himalayan Magpies visit the bare orchards routinely in the evening. They give out loud calls, bathe, play, chase each other, and make our garden their playground.


We are ringing in Christmas by baking Norwegian Christmas Bread Julekage.


Julekage is a famous Norwegian Christmas fruit bread filled with candied peels, raisins and cardamom. It has a soft buttery crumb and a lovely glistening crust. Home smells heavenly when Julekage bakes.


I have made an eggless version of the bread. You may use one egg and reduce two tablespoons of water.

I have given the recipe for egg wash as well as milk wash. You may go ahead with either of the two.

A slice of Julekage with a cup of coffee is pure bliss.


Julekage (Eggless)

Dough

  • 3 1/3 cups all-purpose flour
  • 2 ¼ teaspoon instant yeast
  • ½ teaspoon salt
  • ¼ cup granulated sugar
  • ½ cup butter
  • 1/3  cup evaporated milk
  • 2/3 cups + 2-3 tablespoons water
  • ½  teaspoon ground cardamom
  • ½ cup golden raisins
  • ¼ cup candied citrus peels
  • 2 tablespoons black currants

Glaze (Egg wash or milk wash depending on your preference)

Egg Wash

Combine 1 large egg and 1 tablespoon milk

Milk Wash

Heat 4 tablespoons of milk until very hot. Add 2 tablespoons sugar and 1 tablespoon butter.

4 tablespoons granulated sugar

Icing

  • ½ cup icing sugar
  • ½ tablespoon  water
  • ½ tablespoon butter (softened)
  • ½ teaspoon almond extract

Instructions

  1. In a large bowl, take 1 cup flour, yeast, salt and sugar.
  2. In a saucepan, heat evaporated milk, water and butter until nice and warm (not hot) and almost all the butter melts. Add to flour mixture. Mix for about 3-4 minutes to get a smooth and homogenous mixture.
  3. Add the remaining flour and mix with a spoon. Knead on the floured counter for 5-6 minutes to get a smooth and elastic dough.
  4. Place dough in an oiled bowl. Turn to grease top. Cover and keep in a warm place to rise for 1-2 hours or until puffy.
  5. Combine cardamom, raisins, currants and candied peels in a bowl. Keep aside.
  6. Punch dough and turn onto a lightly floured surface.
  7. Flatten the dough and spread the raisins, currants and peels across the dough. Fold the dough and knead fruits evenly throughout the dough. Cover and let the dough relax for 10 minutes.
  8. Shape the dough into a smooth ball and place it in the centre of the parchment paper-lined baking tray.
  9. Brush glaze (egg wash or milk wash) over the top and sides of the dough. Cover and let it rise in a warm place until the dough almost doubles and indentation remain after pressing with a finger. Brush again with glaze and sprinkle sugar on top.
  10. Bake in a preheated oven at 180 degrees C for 30-35 minutes or until the top turns golden. Remove from the oven and cool on the rack.
  11. Combine all the ingredients of icing to get a thick flowing consistency. Drizzle over the cooled loaf. Add some glace cherries.

Linking to #BreadBakers


#BreadBakers is a group of bread loving bakers who get together once a month to bake bread with a common ingredient or theme. Follow our Pinterest board right here. Links are also updated each month on this home page.

We take turns hosting each month and choosing the theme/ingredient.

The theme this month is Christmas Breads


Recipe: Redstar Yeast


OlderStories Home