Crisp cookies with the goodness of wholegrain,  oats, and walnuts make a great snacking option. Chocolate and cinnamon lend a lovely flavour and makes the cookies addictive.


December got early snow this year. Trees have shed the leaves and the forest looks a dull brown. The twigs crunched under the feet as we walked towards the forest. Strands of thin light filtered through the branches forming myriad patterns on the mossy ground. The beauty of the forest is always comforting and soothing, especially in the morning. And, a trip to the forest is always rewarding. 


We discovered walnuts scattered on the stony forest floor under a massive walnut tree. We picked them all.


The walnuts from wild trees have a very hard shell. It really requires a lot of patience to get the kernels out. And, in the hills, there is always enough time to sit in the Sun and enjoy  this activity.
We collected the milky sweet kernels and used some in our cookies.


The Cookies are eggless, wholegrain and studded with crunchy walnuts. Almonds also make a good addition in place of walnuts. A pinch of cinnamon adds a lovely flavour. 

Wholegrain Chocolate Walnut and Oat Cookies

Ingredients

  • 1 cup rolled oats
  • ¾  cup whole wheat flour
  • 100 Gms butter (½ cup)
  • ¾ cup unrefined sugar 
  • 1 pinch   salt
  • 3 tablespoons cocoa powder
  • 1 teaspoon baking powder
  • 1 pinch baking soda
  • ½ tsp cinnamon powder
  • ½ cup walnuts or almonds chopped fine
  • 2 to 3 tablespoons milk

Instructions

  1. Sieve together whole wheat flour, cocoa powder, baking powder, baking soda, and salt.
  2.  Add rolled oats and walnuts/almonds and mix well. 
  3. In a separate bowl beat butter and sugar till light and creamy. Add cinnamon powder and mix well.
  4. Add dry ingredients to this butter mixture. 
  5. Mix with hands.  The mixture should resemble bread crumbs.
  6. Add two tablespoons of milk. Mix. If the mixture does not come together as a dough, add more milk. If the mixture feels very dry, only then add another tablespoon of milk.  The dough should be very soft and not sticky.
  7. Line a baking tray with a parchment sheet.
  8. Take a small portion of the dough, roll it between the palms and flatten it. Arrange the cookies on the greased baking tray leaving a little space between them. 
  9. Bake in a preheated oven at 160 degrees C for about 15 minutes. 
  10. Once done, remove from the baking tray after 5 minutes. Cool and store in an airtight container.

My notes
Add the third tablespoon of milk only if required. The dough should not be too wet and sticky. The cookies are ready in fifteen minutes. Because the cookies are dark, it is difficult to judge the change in colour. If cooked for more then 15 to 17 minutes, they start burning from the bottom. Remove cookies after 5 minutes from the tray. The cookies are very soft and tend to break if removed early.


Last Sunday, I baked Cornmeal Raisin bread for breakfast. I had a lot of cornmeal which needed to be used. Intense flavour of cornmeal and the gentle sweetness of raisins made this bread really special. Great to have with honey, peanut butter or home made jam or just enjoy it plain with a cup of tea. Here goes the recipe-


Ingredients
1 cup coarse yellow cornmeal
3 cups all purpose flour
2 teaspoons instant yeast
3 tablespoons sugar
1 cup milk
2 tablespoons olive oil
½ teaspoon salt
1 cup raisins
½ cup water (quantity of water can vary )
Method
 Soak cornmeal in a cup of milk in a bowl so that it becomes soft. Cover the bowl and leave for half an hour. Dissolve sugar in half cup warm water and add yeast. Mix well and cover the pan. In the meantime, sieve together flour and salt. Add olive oil and mix evenly. Now add cornmeal soaked in milk. Mix well with hands. The mixture should be moist and crumbly. Add warm water yeast mixture and raisins. Knead the dough for five to six minutes. The dough should be soft and not sticky. Shape into a round ball and gently transfer it to a greased tray or cake tin.


Cover it and keep it in a warm place for an hour or more or till it becomes double the original size.


Once it is well risen, score the bread and bake it in a pre heated oven at 180 degrees C for 40 minutes. The top should turn golden brown and the baking tin should sound hollow when tapped from the bottom.


Remove from the oven. Let it rest in the baking tin for five minutes. Transfer it to the rack to cool.


Slice when it becomes cold.


 My notes:
I have used instant yeast in this bread. It needs only one rising. If you are using active yeast, then after one rising punch the dough, knead for another three four minutes and then let it rise for another one hour.
Making jam is a pleasurable experience. My mother did a course on making jams in the 70s. Mom had a notebook in which whatever was taught in the class was noted down meticulously. She had also maintained a file with recipes of all that she had learnt in her course. Once the course was over, mom seldom made jams. It was my dad who took to jam making very seriously. He made every jam that my mom learnt to make. He read her notes and sometimes added his own touch by adding or changing the ingredients. Over a period, he gained expertise in jam making. Every seasonal fruit was made into jam and bottles of different kinds of jams would always be sitting in our pantry.  One such jam, rather an unusual jam that I remember was Banana Mango Jam.


It was unimaginable that banana could be put in a jam. But this jam is really very different in flavour and taste. It has a very fruity flavour and a thick texture. Great with home made bread, chapattis or paranthas. Here goes the recipe-


Mango and Banana Jam

Ingredients

  • 3 cups ripe juicy mangoes cut into small pieces
  • 2 cups ripe bananas cut into small pieces.
  • 2 lemons
  • 5 ½ cups sugar
  • 1 teaspoon butter.

Instructions

Cut banana into thin slices and put them in a bowl.  Squeeze the lemons into the bowl and toss the banana slices in lemon juice. This prevents banana slices from turning black.


Now add mango pieces and sugar and mix well. Cover the bowl and keep aside for an hour. Now using hands, mash fruit  pieces roughly. Empty the contents to a thick bottomed non aluminum vessel. Cook on high flame stirring continuously. When the jam starts boiling, add butter and cook on low flame stirring at short intervals.


After about an hour, the jam will thicken and will start sticking to the bottom of the vessel. At this point, it needs continuous stirring to prevent the jam from burning.


In another ten fifteen minutes, the jam will start coating the ladle thickly. And if you let it run down the ladle, it will fall in blobs. This means jam is done. Turn off the gas.
While the jam is getting cold, it is time to sterilize the bottles.
Place the washed and dried bottles with the lids in the oven. Set the temperature to 100 degrees and set the timer to 10 minutes. Remove the bottles and their lids from the oven. Ladle hot jam into the jars leaving ¼ inch headspace. Secure the lids tightly.


Last month my sister was with us for a week. After her marriage, we get to meet twice or thrice in a year though we talk on the phone almost every day. Sisters share such special bond. There is always so much to talk about, so much to share and discuss that any amount of time seems less. We gave her a surprise by celebrating her birthday though it was a month away. I baked a Dates Cake for her.


Eggless Wholegrain Date Cake

Ingredients


  • 20 dates
  • ½ cup sugar (powdered)
  • ¾ cup milk
  • 1 cup whole wheat flour (atta)
  • ½ cup olive oil (canola oil or sunflower oil will also do)
  • 1 teaspoon baking soda
  • ¼ cup chopped walnuts or almonds and a handful of chopped dates.

Instructions

  1. Remove seeds from the dates and soak them in warm milk for about 3 hours. The dates should swell and become very soft. 
  2. Preheat oven to 180 degrees C. Grease and line one 6.5 inch cake pan. If you are using a bundt pan, grease generously and dust with flour so as to coat the pan evenly.
  3. Blend dates and milk in the mixer till you get a smooth mixture. 
  4. Pour this mixture in a pan. Add oil and sugar and mix well.  
  5. Sieve together flour and baking soda. Add it slowly to the milk, dates, oil and sugar mixture. Mix well. Fold in chopped walnuts.
  6. Pour the batter into the prepared pan. 
  7. Add chopped dates on top and bake in a preheated oven  for 35 minutes till a skewer inserted in the cake comes out clean.


Dates cake is a very soft cake with a unique flavour and sweetness of dates. 
My notes:
I used whole wheat flour. This cake can also be made with all purpose flour. The dates make the cake very sweet. The quantity of sugar can also be adjusted according to taste.


One of the most unfortunate trends of the last many years is that white bread is still more popular than whole grain bread. Refined flour has had the brown husk of the grain stripped away that contains most of the vitamins and nutrients. Without the fibrous husk, refined starches are broken down quickly into sugar and absorbed immediately in the blood stream. White bread is easier to digest but it leaves you hungry soon.  Whole wheat bread or multigrain bread takes longer to digest, releasing energy slowly. This makes you feel full for a longer period, reducing hunger pangs. Plus, it has all the goodness of grains.
Making bread is easy. There is nothing that tastes better than a loaf of freshly baked bread.


I often make multigrain bread at home. My daughter loves to take it to school.
You can take flours of your choice. 


Multigrain Bread

Ingredients

  • 2 cups whole wheat flour
  • 1 cup rolled oats (powdered) + 1 tbsp for sprinkling
  • ¼ cup Raagi (finger millet) flour 
  • ¼ cup Soya flour
  • ¼ cup olive oil (canola oil, sunflower oil or any other oil can also be used)
  • 2 ½ teaspoons instant yeast
  • ¼ cup honey
  • 1 teaspoon salt
  • ¼ cup milk powder
  • 1 teaspoon milk
  • 1 cup water (quantity of water depends on requirement while kneading)

 Instructions


  1. Mix yeast in the warm water and keep covered for a while. In about 15 minutes, it should become frothy. 
  2. In another pan, mix all the flours, milk powder, salt and oil. Add honey and mix well. 
  3. Now knead this mixture with the frothy yeast and water mix. If the dough feels hard, add more water gradually. I used local grains that kept absorbing water.
  4. Knead the dough for 8 to 10 minutes. The dough should become soft and supple. It should not be sticky.  Transfer the dough to a greased bowl and cover the bowl. Let it rest for an hour or until double its size.
  5.  Punch down the dough, knead again for 2 to 3 minutes. Shape into a loaf and transfer to a greased loaf tin. Cover, and let it rise till it becomes double its size. 
  6. Shape the kneaded dough, place it in an 8 inches x 4 inches inch greased loaf tin. Cover the loaf tin and keep it in a warm place.
  7. Allow the bread to rise for an hour or until double. 
  8. Brush the top with milk and sprinkle oats.
  9. Bake in a preheated oven at 180 degrees C for 30 minutes. The top should turn golden and the container should sound hollow when tapped at the bottom.
  10. When done, remove from the oven and remove from the loaf tin after 5 minutes.
  11.  Cool it on a wire rack.  Slice when cold


Whenever we have a bunch of bananas at home, I am always tempted to bake a cake or bread using bananas. Bananas lend a beautiful aroma to the baked products and make the breads and cakes super soft. In today’s post, I am sharing the recipe of my favourite Banana Loaf.


Ingredients
1 ½ cups whole wheat flour (atta)
4 ripe bananas mashed
¾ cup powdered sugar
½ cup curd
1/3 cup olive oil
1 teaspoon baking soda
1 pinch salt
1 teaspoon vanilla essence


Method
In a bowl, mix together mashed bananas, powdered sugar, salt, olive oil, vanilla essence and curd. In another bowl, sieve together whole wheat flour and baking soda. Now add this to the wet ingredients and mix till all the ingredients are just well combined. Pour the batter in a greased and lined loaf tin. Bake in a pre-heated oven at 180 degrees for about an hour. The loaf should turn golden and the skewer should come out clean when it is done. Let it rest in the oven for 5 minutes. Remove from the oven and take it out of the loaf tin and keep it in the wire rack to cool.


Banana loaf has curd and bananas. It is a moist loaf. It spoils if kept for more than two days. It is best to consume in two days. Otherwise keep the slices in the refrigerator.


Bael also known as Stone Apple, is an indigenous plant commonly found in India. If you visit the countryside during summers, a lush green bael tree laden with bael fruits is likely to soothe your eyes in an otherwise parched landscape. In Kumaon, it is a tradition to have a bael tree at home. My father has three of them. He nurtured them with great love and care till the plants turned into trees. During summers, we used to hunt for ripe bael fruits fallen and hidden in the grass. Now my daughter loves to spot one and get it to her Nana.


Bael fruit has great medicinal properties. The yellow sticky sweet pulp consists of carbohydrates, proteins, vitamin C, iron, phosphorous, carotene, thiamin and fiber. Bael is very good for stomach and is useful in the treatment of digestive and gastrointestinal disorders. Ripe bael fruit tones up the digestive tract and promotes proper bowel movement. It is a natural laxative and removes constipation. Bael fruits are most widely used in Ayurvedic medicines due to its strong digestive and carminative properties.


Bael Nectar is made from the naturally ripened bael fruits. My father guided me to make Bael Nectar and it was his suggestion that I post this recipe in my blog.


Bael nectar or Bael jam is a way of preserving the Bael fruit as Bael fruit has immense health benefits and is not available round the year. A spoonful of Bael nectar with milk tones the stomach improves digestion and helps in constipation. It can also be had with bread and chapatti as jam.


Bael Nectar | Wood Apple Jam | Stone Apple jam

Ingredients


  • 2 cups pulp of ripe bael fruits
  • 2 cups sugar
  • ¼ cup water
  • Juice of two lemons

Method


  1. Remove pulp from the fruits and put it in a bowl.
  2. Add ¼ cup water to it and mash the fruit. Pass the pulp through a fine sieve. Remove all the seeds and fibrous strands.
  3.  Add sugar to the sieved pulp and let it rest for an hour. 
  4. Add lemon juice. 
  5. Cook this on a medium flame. Keep stirring the pulp to prevent it from sticking to the bottom of the pan and burning. 
  6. In an hour’s time, the nectar will become thick and will be reduced to half of its original volume. When it falls from the ladle in blobs, it is done.
  7. Turn off the heat and let it cool. 
  8. In the meantime, sterilise the bottles. Place the washed and dried bottles with the lids in the oven. Set the temperature to 100 degrees and set the timer to 10 minutes. Remove the bottles and their lids from the oven. 
  9. Fill the nectar in the sterilised bottles while the nectar is hot.


I have always loved Unibics’ delectable Breakfast cookies. The cookies are so addictive that the pack once opened, finishes in no time. The fruity aroma of the cookies and chewy texture with the goodness of oats, raagi, cranberries, karonda has beckoned me to try making them at home. However, one day when I seriously decided to make them, I realized that many of the ingredients are not available in the market here. I made Oats and dates biscuits instead. The biscuits came out very well. Here goes the recipe-

Ingredients
1 cup rolled oats
1 cup whole wheat flour (atta)
½ cup chopped dates
½ cup (100gm) butter
½ cup sugar powdered
½ cup sugar granulated (for the chewy feel)
1 tsp baking soda
10 almonds coarsely ground
1 tablespoon flaxseeds
2 teaspoons vanilla essence


Method
Mix together whole wheat flour, oats and baking soda. Cream together butter and powdered sugar. Powder the flaxseeds in a blender, add ¼ cup water and blend again. Add this to the butter sugar mixture. Add chopped dates, coarsely ground almonds, vanilla essence, granulated sugar and mix well. Add dry ingredients to this mixture and knead gently. Add a little milk if the dough feels too dry.

The dough should be soft and pliable. Take care that the dough should not be too wet and sticky. Else biscuits will turn out very hard.


 Now make small balls and flatten them between palms. You can also use a bottle cap to cut out biscuits. Arrange on a greased baking tray. Bake in the pre- heated oven at 180 degrees C for about 20 minutes or till the edges turn brown.


Monsoon is in its retreating phase. We had a fair share of rain here though it was scanty in the beginning. Earth is pulsating with life. Every seed that fell into the parched earth has turned into a miniature tree. Our kitchen garden has turned into a forest with hundreds of Neem, Jamun and Ashoka trees growing and affirming struggle for existence and the survival of the fittest. Earth is a great transformer. Give it a seed, it will grow into a tree which will produce a hundred seeds with each seed promising to become a tree, thus sustaining itself and restoring balance. Only if we could learn from the Earth’s generosity!


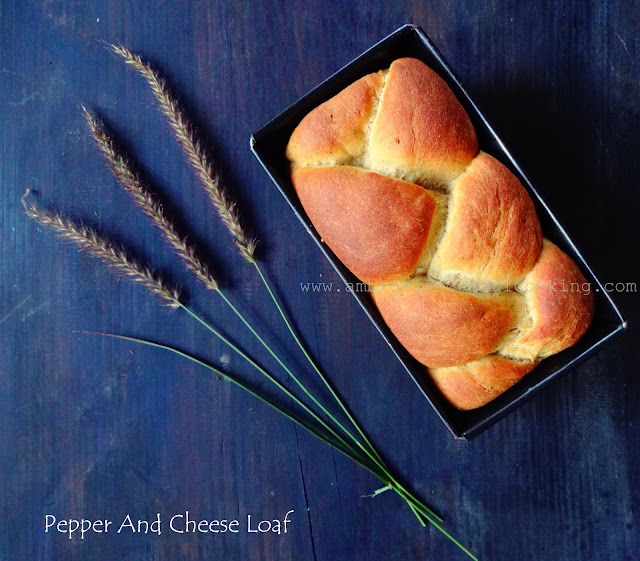
 Recently, we baked Cheese and Pepper spiral loaf for dinner. It is a must-try recipe. The cheesy-peppery flavour of the bread is a sure heart winner!


Cheese And Pepper Loaf


Ingredients

  • 1 ½ cups all-purpose flour
  • 1 cup whole wheat flour (atta)
  • 1 ½ teaspoon instant yeast
  • 2 tablespoons sugar
  • 1 ½ teaspoon salt
  • 2 tablespoons  oil
  • 1 tsp ground pepper
  • ½ cup milk
  • 1 cup water (start with ½ cup water; if the dough feels dry gradually add more warm water while kneading)
  • ¾ cup grated cheese (I used Amul processed cheese)

Instructions


  1. Mix together warm milk, ½ cup water,  and add yeast to it. Mix well and cover.
  2. The mixture should turn frothy in 15-20 minutes. 
  3. In the meantime, sieve together all-purpose flour, whole wheat flour and salt.  Add oil and mix well. Now add ground pepper and grated cheese. Mix evenly. Now add water, milk mixture and knead for about 5 – 8 minutes. The dough should be very soft. Add more warm water if needed.
  4. Those using active dry yeast may place the dough in a large bowl and cover it with a damp cloth for about an hour or till the dough becomes double in size. Punch and knead again for 5 minutes. 
  5. Grease the baking tray or a rectangular loaf tin. Divide the dough into 3 parts. Make a braid that is long enough to fit into the loaf pan you are using.
  6.  Place the loaf in the prepared loaf pan. Cover with a damp cloth and keep it for one and a half hours or until double in size.
  7. Bake in a preheated oven at 190 degrees C on the central rack for about 20 minutes till the top turns golden.
  8.  Remove from the oven after 5 minutes. Remove from the tray after another five minutes. Place on the cooling rack and brush the top with butter.
  9. Slice the loaf when cold.


NEEM FOREST IN OUR KITCHEN GARDEN


I make a lot of whole wheat bread at home. Generally, I  bake two loaves at a time. We often have it for dinner or lunch and it saves me from the rigmarole of standing and making chapattis specially on days when I am exhausted. When the kids are hungry, it feels nice to give them home made bread with home made jam. The whole wheat bread available in the market has a very small percentage of whole wheat flour. It has a greater percentage of refined flour along with preservatives, emulsifiers, dough conditioners, acidity regulators and artificial colours.  All this is avoidable. Whole wheat bread is easy to bake and great in taste. My kids love its taste so much that they don’t like the bread from the market.
Ingredients
2 ½ cups whole wheat flour (atta)
4 tablespoons olive oil (any other oil can also be used)
1 teaspoon salt
1 ¼   teaspoon instant yeast
3 tablespoons sugar
1 cup water (quantity of water depends on requirement while kneading the flour)


Method
Dissolve sugar in water and heat the water. When the water is warm, add instant yeast, mix well and cover the pan. In the meantime, sieve together flour and salt. Add olive oil and mix well. The water, sugar and yeast mixture should turn frothy in 15 minutes. Add this to flour and knead well for about ten minutes. The dough should be soft. It should not be sticky. Now shape it into a loaf of desired shape and place in a greased loaf tin. Cover with a damp cloth and keep it in a warm place for about an hour or more. During summers, the bread rises well and the process takes about an hour. During winters it can even take about two hours for the bread to rise well. Bake in a pre heated oven at 200 degrees C for 20 minutes or till the bread turns golden brown. Take it out of the oven after five minutes and remove it from the loaf tin.  Brush the top with butter and keep it in the rack to cool.

This is the basic recipe for the home made bread. One can be very creative in adding different types of herbs, seeds and spices and thus make breads of different flavours. 
Whole wheat bread does not contain refined flour. Because of this, the bread is dense and crumbly.
Generally cooking breakfast, lunch and dinner day in, day out becomes very monotonous. By weekend a kind of boredom creeps in and I don’t feel like working in the kitchen. This is the time when my husband takes over. He looks forward to weekends. Weekends are relaxing. He loves working in the kitchen and trying out his recipes. Last Saturday, I made Garlic Pav and my husband made pasta with sweet corn. It was a great combination.
Garlic Pav or Garlic bread is for those who love strong garlic flavour. It tastes great with   simple veggie, pasta, with cheese spread or just plain.  It has a strong garlicky flavour.


Ingredients
2 cups whole wheat flour
1 ½ cups all purpose flour
1 teaspoon salt
2 tablespoons sugar
2 teaspoons instant yeast
2 tablespoons olive oil
8 to 10 buds of garlic peeled and crushed.
1 ½ cups warm water to knead the flour (quantity of water can vary according to requirement)
Method
Add sugar to the warm water along with yeast. Stir till sugar dissolves. Cover the pan. In the meantime sieve together whole wheat flour, multipurpose flour and salt. In a wok, add 2 tablespoons of olive oil and add crushed garlic. Turn on the gas to low flame. Cook for a few minutes before garlic starts changing colour. Turn off the gas. Olive oil gets suffused with the aroma of garlic. When olive oil with garlic gets cold, add it to the sieved flour and mix well. In the meantime, water sugar and yeast mixture should have turned frothy. Add this to the flour gradually and knead the flour. Knead well for about 8 to 10 minutes. The dough should be really soft. Divide the dough in 10-12 balls. Roll out the balls and pull them to make oblong Pav.

In a greased square or rectangular cake tin place the pav side by side keeping enough space between them as they will rise. Cover the tin and keep it in a warm place. Garlic Pav contains whole wheat flour. It will take about to two hours to rise well.

 Bake in a pre heated oven at 180 degrees C for twenty minutes. Once done, transfer it to a rack to cool and brush the top with butter(Vegans can avoid this).


Read health benefits of GARLIC
NewerStories OlderStories Home