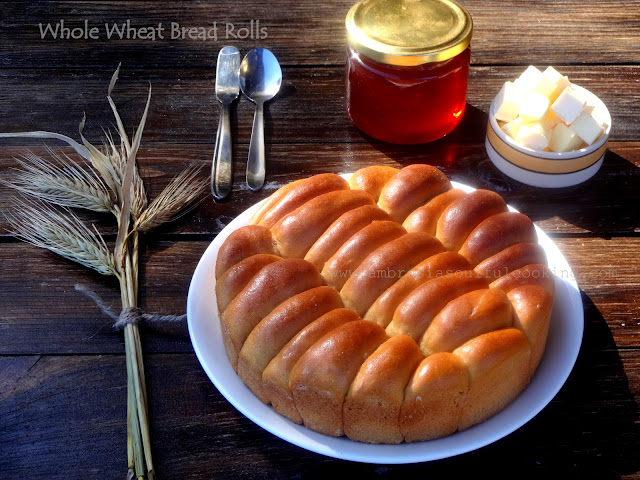
Whole Wheat bread rolls are soft and delicious. The rolls are bite-sized and make a perfect snack.     Enjoy with butter, homemade jam or honey.


We are at the peak of winter. The orchards are bare, the shrubbery brown and a calm pervades all around. Winter brings with it subzero temperatures and icy winds. The Sun is pale and mostly thick clouds dominate the sky rendering it ineffective.


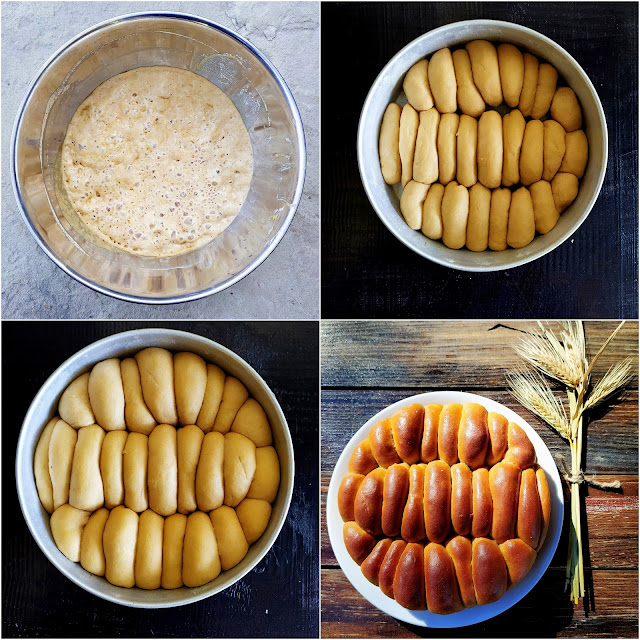
Baking days are over. The yeast just refuses to awake from its slumber. It needs to be pampered by keeping the dough in the Sun and then keep moving with the movement of the Sun. A few days back, the day started on a bright note. And the bread baking spirits rose high. The dough was prepared quickly and placed under the pear tree where the Sun gets strongest in the morning. It took 4 hours for the dough to double. Second proofing had to be done in the oven itself. The dough was shaped into small bite-size rolls.

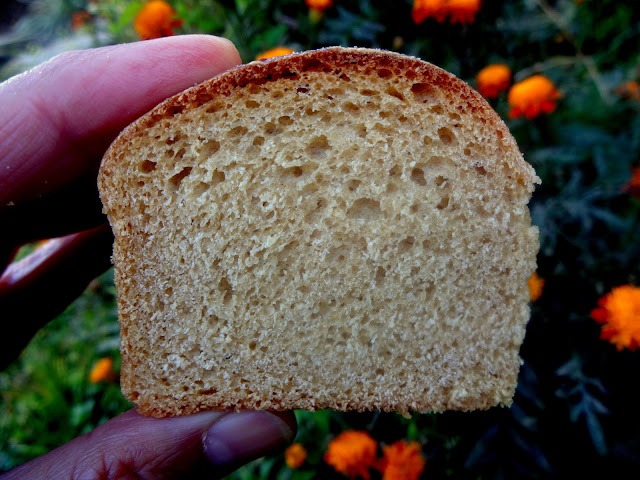
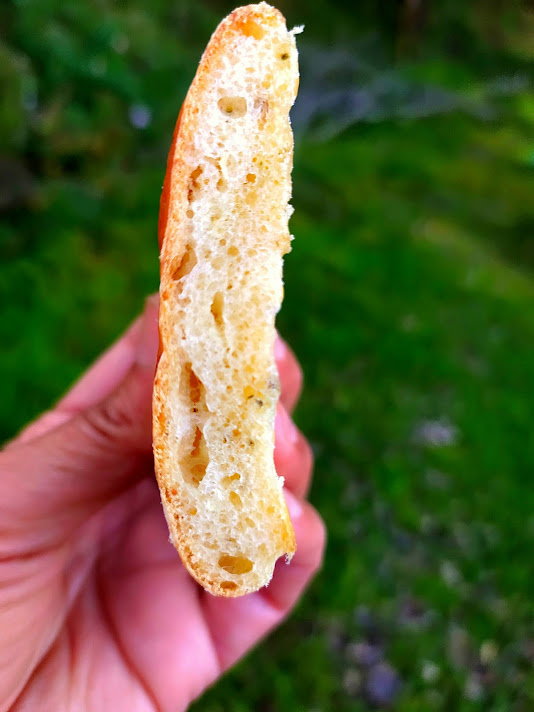
When it comes to baking with whole wheat flour, bread rolls are the best bet. Somehow I feel that the rolls are small in size and cook well through. You don’t get a doughy centre that sometimes happens in a loaf. Well, this is my thought and idiosyncrasy, and I always prefer rolls to loaf.


In this recipe, we make a sponge. That makes the rolls really soft.  The sponge method produces bread with more complex flavours and a lighter texture. This method suits baking with whole grain flours very much. And the dough needs just one rise. This suits baking in the winter.

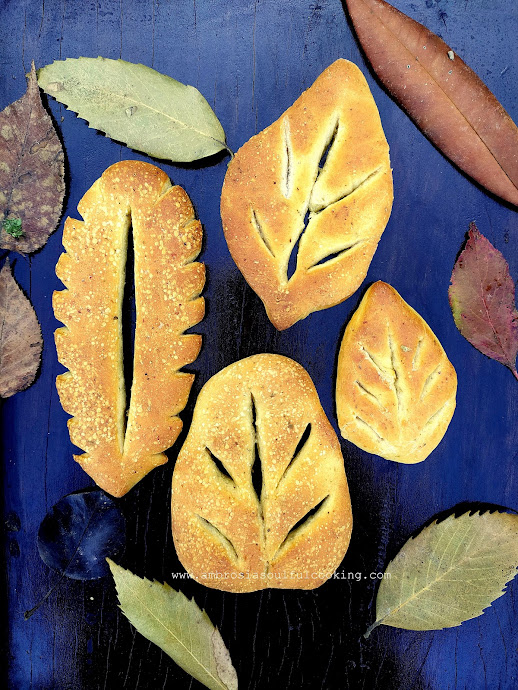
This time, I decided on shaping rolls in a different way, I made oval rolls and arranged them in an eight-inch cake pan that was greased well and dusted with flour. The rolls came out soft and spongy.


On winter nights, we love to slice our rolls, spread a little butter and toast them on the hot griddle. It makes a lovely accompaniment to a bowl of soup and makes a fulfilling light dinner.


Whole Wheat Bread Rolls (Vegan)

Ingredients

Sponge

  • 1 cup whole wheat flour
  • 1 cup warm water
  • 2 tablespoons unrefined sugar
  • 1 tablespoon instant dry yeast

Dough

  • 2 cups whole wheat flour
  • 1 teaspoon salt
  • 2 tablespoons oil
  • 2 tablespoons lemon juice (or, ¼ cup orange juice)
  • Sponge (as above)

Instructions

Sponge

Mix all the ingredients mentioned under the sponge in a bowl. Mix 2-3 times to get a smooth batter. When all the ingredients are well incorporated, the mixture will become stringy. Cover and let it sit for I hour. It will rise and become very bubbly.

Dough

  1. In a large bowl, take all the ingredients of the dough and add sponge. Mix and knead for 5-6 minutes or until you get a very smooth and satiny and slightly sticky dough.
  2. Grease one 8 inches round cake pan. Pinch small balls of dough and shape them into rolls. Place the rolls in the prepared pan. Cover and keep in a warm place until the rolls double in size.
  3. Bake at 180 degrees for 35-40 minutes or until brown.
  4. Brush warm rolls with butter.
  5. Serve warm. 


Mini Fougasse is inspired by nature. Crisp crust and soft chewy crumb, fougasse has a delicate 
flavour of herbs. it makes a lovely appetizer and a great accompaniment to soups.


Winter is beautiful. The bleakness and dullness has a charm. The bare trees and brown shrubbery also hold beauty. In the monotone, there are myriad shades of nature’s hues. Temperature is dipping with each passing day. The hoarfrost on the leaves and grass crackles and crunches under the feet as we walk around in the garden. The frost on the roof melts when the rays of the Sun reach our side of the hills and water drops roll down the roof and fall on the stones sonorously.


Fruit trees are all bare and the buds are swollen waiting for the Spring to wake them up from the slumber. The Wild Cherry Tree however looks vibrant and glamourous laden with pink dainty flowers. It has become a centre of activity as a million bees, birds and butterflies hover on it for their share of nectar. We often see a Mountain Bulbul on the branches.


Winter dinners need to be simple and light on the stomach. We baked some mini Fougasse to dip into our hot carrot soup.


The Fougasse is inspired by the beauty of the leaves of different shapes, sizes and patterns. We made tiny Fougasse and tried to shape them like the leaves in nature. A dash of dried herbs made it really fragrant and flavourful and we loved it with soup.


Fougasse is a French flatbread that is similar to Italian Focaccia.  The crust is crisp, while the crumb is slightly chewy. Fougasse is traditionally cut to resemble a leaf or sheath of wheat, with open areas within the bread. The open areas help the bread to bake incredibly quickly. The cuts also maximize the surface area of the bread that gets crusty.


Fougasse is easy to prepare. No bread pans and no moulds, just a little creativity and inspiration from nature.

Fougasse is typically served whole or as a part of an appetizer.


Mini Fougasse (Vegan)

Preferment

  • ½ cup warm water
  • ¼ teaspoon instant dry yeast
  • 1 cup all-purpose flour

Dough

  • ½ cup warm water
  • ½ teaspoon instant dry yeast
  • 2 tablespoons olive oil
  • 1 ½ cups all-purpose flour
  • 1 teaspoon mixed dried herbs
  • ½ teaspoon salt

Instructions

For The Preferment

  1. Take water in a medium bowl, add yeast and let the mixture stand for 10 minutes.
  2. Stir in flour and mix to form a shaggy dough. Mix further until the dough becomes smooth and elastic and a little tacky.
  3. Cover and keep aside for 5-6 hours or overnight in the refrigerator.

For The Bread

  1. Mix flour, dried herbs and salt. Keep aside.
  2. In a large bowl, take water, add yeast and stir to mix. Let the mixture stand for 10-2 minutes.
  3. To this, add flour mix, olive oil and preferment. Stir with a sturdy ladle. When the dough comes together as a shaggy mass, cover and let rest for 20 minutes. The dough will hydrate fully.
  4. Now knead on the counter for 5-6 minutes or until you get a  smooth and silky dough. Add a little flour if the dough is very sticky.
  5. Transfer the dough to an oiled counter. Turn around once so that it is evenly coated with oil. Keep in a warm place for around one hour or until double.
  6. Punch the dough. Cut the dough into two pieces. Cut each piece into four small pieces each. Cover and let rest for 5 minutes.
  7. Line a baking tray with a parchment sheet.
  8. Work on one piece of dough at a time. Stretch with hands, use a knife and scissors to make leaves with slits and designs.
  9. Place the leaves on the baking tray keeping space between them. Cover the baking tray and keep it in a warm place for 20-30 minutes or slightly puffy.
  10. Preheat the oven to 180 degrees C while the dough is proofing.
  11. Bake for 20-25 minutes, or until the bread is well browned.
  12. Serve warm.

 Linking to #BreadBakers


BreadBakers
BreadBakers is a group of bread loving bakers who get together once a month to bake bread with a common ingredient or theme. Follow our Pinterest board right here. Links are also updated each month on this home page.
We take turns hosting each month and choosing the theme/ingredient.


This month the Bread Bakers, hosted by Kelly of Passion Kneaded, are creating bread art. We have shaped bread, decorative bread scoring, and sculpted bread


 Garlic and Herbs Dinner Rolls are amazingly soft, fluffy and delicious. Dunk into hot soup or eat just plain, it's delicious!


It is the fag end of Autumn and the early phase of winter. Mornings and evenings make us shudder as the temperature drops. Noons are the stuff dreams are made of. Comforting warm Sun wrings out all the woes. 


Autumn is the season of the butterflies. 


Butterflies of amazing colours throng the wildflowers and marigolds.

 In one corner of the sun fed lawn, the dough for garlic rolls is sunning and rising.


 As soon as it doubles up, it is shaped into pretty rolls and again kept in the sunny patch. The rolls rise and fill up all the gaps between them and are taken in for baking.


It is a no-knead recipe. The dough will get a little sticky but will be manageable.

Use one 12 inch round cake pan or 12 inches cast iron skillet. Make small rolls. This quantity would give you around 24 or more rolls. As soon as the rolls have expanded and almost filled up the gaps, it is time to bake.


During baking, the rolls will expand miraculously and rise up and fill your pan.


Brush hot rolls with herb butter and enjoy the most delicious and fluffy garlic rolls.


Recipe adapted from - The Pioneer Woman

Garlic And Herb Dinner Rolls

Ingredients

  • 2 cups milk
  • ½ cup vegetable oil
  • 2 tablespoons sugar
  • 4 ½ cups all-purpose flour 
  • 2 ¼ teaspoon instant dry yeast
  • 1 tablespoon (scant) salt
  • ½ teaspoon baking soda
  • ½ teaspoon baking powder
  • 4 cloves garlic grated ( half for dough, half for butter)
  • ¼  cup fresh parsley chopped
  • 1 teaspoon fresh rosemary leaves chopped or, any herb of choice

Instructions

  1. Take milk, oil and sugar in a large saucepan. Stir to combine. Heat the mixture on medium heat until it just begins to boil. Immediately remove from the heat and let it cool until lukewarm.
  2. When the mixture is at the right temperature, stir in 2 ½ cups of flour and yeast. After the flour and the yeast are well incorporated, add the remaining flour. Cover and keep the dough in a warm spot for approx 1 hour or until almost double.
  3. When the dough has risen, evenly sprinkle salt, baking powder, baking soda, half the grated garlic and stir well. It is important to stir until well combined. Cover and keep for 5 minutes.
  4. Grease the pan/skillet. If using a cake pan, sprinkle some flour all around. Pinch small pieces of dough and roll into 2 inch balls. Place the prepared dough balls in the pan/skillet. Cover and set aside until the rolls double in size.
  5. Bake in a preheated oven at 180 degrees C for 20-25 minutes or until the rolls become brown.
  6. Combine butter, grated garlic and herbs and melt the butter. Brush the garlic herb butter on hot rolls.


Note – if you are a beginner, the dough might be a bit tricky to handle. In that case, use only 1 ½ cups of warm milk, oil and sugar. Combine all flour, salt and garlic. Now knead it the way you would normally knead the dough for bread. Keep adding more milk as and when required.  After the first rise, sprinkle baking soda and baking powder evenly and knead well for 6-7 minutes. Rest for 5 minutes and then make rolls. In this case, there may be brown specks. You may omit baking powder and baking soda and still get soft fluffy rolls.


Linking to #BreadBakers

BreadBakers


#BreadBakers is a group of bread loving bakers who get together once a month to bake bread with a common ingredient or theme. Follow our Pinterest board right here. Links are also updated each month on this home page. We take turns hosting each month and choosing the theme/ingredient.

This month the Bread Bakers are making dinner rolls, a theme chosen by Swathi, a pretty amazing bread baker, of Zesty South Indian Kitchen


  Water Chestnut flour laddus are gluten-free and healthy. With loads of raisins and cashews, the laddus make a delicious festive indulgence.


It is that time of the year again, Diwali is around the corner and we cannot contain our excitement for the same. Festivals give a perfect reason to be indulgent. Mithais are made in every home and every family has traditional mithai recipes passed down from generations.

One special ingredient that finds its coveted place in our all time family favourite sweets is Water Chestnut flour, commonly called Singhare Ka Atta. Water chestnuts fruits are dried and ground to get flour. It is a nutrient dense gluten-free flour, rich in iron, calcium, zinc and phosphorous.  Water chestnut flour is generally used to prepare goodies during fasting as it keeps the energy levels up.

Every year, we make Water chestnut Flour Laddu during Diwali.  With peanuts, raisins and nuts of choice, the laddu is delicious, addictive and healthy. Use ghee made from cow’s milk for the recipe.

You may add nuts of choice. Roasting water chestnut flour on low flame stirring continuously is important. Roast till a nice sweet aroma wafts through and it begins to change colour. Begin roasting the flour by adding 5 tablespoons of ghee. Once you add peanut powder and boora sugar, take the mixture in your hand and press to bind laddu. If it holds shape, there is no need to add ghee. If it does not, add 1 tablespoon at a time till you are able to bind the mixture and make laddu.


Singhara Atta Laddu / Water Chestnut Flour Laddu (Gluten-Free)

Ingredients

  • 1 Cup Singhara Atta / Water Chestnut flour
  • ½ cup roasted peanuts
  • 5-6 tablespoons ghee
  • ¾ cup boora  sugar (or more according to taste)
  • 2 tablespoons raisins
  • 2 tablespoons chopped cashews

Instructions

  1. Powder the roasted peanuts.
  2. Take Singhara flour in a thick bottom flour. Add 5 tablespoons ghee. Roast on low flame. Roast till the colour changes slightly and you get a sweet aroma.
  3. Add peanut powder to roasted flour. Cook for another 4-5 minutes.
  4. Add boora. Mix well. Take a small quantity of mixture and press it in your palm to make laddu.
  5. If the mixture feels too dry, add another tablespoon or two of ghee.
  6. Add raisins and cashews and make laddu while the mixture is hot.
  7. Take a handful of the mixture and make walnut size laddu.
  8. Store in an airtight container.

 Whole Wheat Coconut Muffins are coconutty and delicious and make a great accompaniment to a cup of tea. Chocolate adds a lovely twist to the muffins.


Our hills abound in autumn vibes at this time of the year. The colours, flavours, fragrances, flowers, bees and butterflies make the days so beautiful and mesmerizing and the warmth of the Sun is soothing and comforting.


Sitting on the carpet of green and gazing at the endless valley is a monotony we love. Sometimes, doing nothing is also relaxing and rejuvenating. Himalayas form a spectacular backdrop against the azure sky and birds play some soulful music. We hear the ripe pears falling with a thud and see some Yellow-throated Martens feasting on them. 


A barbet calls loud and clear from some nearby tree. A Rufous Treepie swoops down, catching the insects midair.


There is some kind of placidity and mirth that permeates the soul. Autumn is really delicious. When the heart is so happy and the soul so contended, you want to add more joy to your day and bake something special. Our most special bakes are rich in the purity of ingredients. It is the guilt-free indulgence that makes them special. 


We baked Eggless wholegrain coconut chocolate cupcakes.


 Chocolate always makes everything better, so a dark chocolate piece was placed atop every muffin before baking. The flavor of coconut and the chocolate was simply divine.


Whole Wheat Coconut Muffins

 Ingredients

  • 1 ¼ cup whole wheat flour
  • ¾ teaspoon baking powder
  • ½ teaspoon baking soda
  • 1 pinch salt
  • 1/3 cup thick curd (not runny)
  • ¼ cup oil
  • ½ teaspoon vanilla extract
  • 1 cup to 1 ¼ cup unrefined sugar
  • ¼ cup desiccated coconut
  • ½ cup warm milk 
  • 12 pieces of dark chocolate

Instructions

  1. Preheat oven to 180 degrees C.
  2. In a large bowl, whisk together flour, baking powder, baking soda and salt. Add desiccated coconut. Keep aside.
  3. In another deep bowl, whisk curd until smooth.
  4. Add oil, sugar and vanilla extract.
  5. Add dry ingredients in three shifts adding warm milk after each addition.
  6. If the batter feels dry, add more milk. The batter should not be too dry or runny.
  7. Pour into the 12 cupcake moulds filling halfway through. The moulds should not be more than 2/3  full.
  8. Place a piece of dark chocolate on top of the batter in each mould.
  9. Bake for 18-20 minutes or until the top of the cupcakes turn golden.
  10. Remove the muffins from the oven after 10 minutes.
  11. Remove from the moulds when cold.


 Japanese Milk Bread Buns are soft and sweet buns with spicy tones of ground cinnamon and citrusy notes of the candied orange peels. Buns taste amazing with butter.


Autumn is about blue skies, a million wild cosmoses, wild daisies, chrysanthemums, warm hugs of the Sun, cool breeze, colourful butterflies and all that makes the heart joyful and soul contented. Crisp weather, gorgeous scenery and tranquillity, colours of Autumn lift your spirits.


Fog tinted trees stand in the forest. Dew makes the leaves studded with pearls, and the drops keep rolling down from the leaves making sonorous notes as they fall on the vegetation below.  Mornings are misty, cold with the snow-capped peaks shining on the horizon.


Pear trees are shedding leaves, a wee bit early, as the ripe pears are still hanging on the bare branches. Birds keep pecking the juicy fruit. A loud thud every now and then indicates that a ripe pear has fallen down. Pears get camouflaged in the grass and kids love to spot them and get home the trophy. Sliced pears smeared with chilli garlic salt taste lovely.


Wedge Tailed Green Pigeons visit the pear tree quite often, especially during morning hours and seem to love perching on the branches after having their fill of the sweet fruit.

As we enter the late autumn, our baking timetable changes and the bakes have to be done with before the afternoon. The Sun is warmest and makes the dough rise like magic. Yesterday, we baked Japanese Milk Bread Buns using the Tangzhong technique.


This is the Asian bread technique that has origins in Japan’s Yukone (or Yudane) and was popularized across Asia by Taiwanese cookbook author Yvonne Chen. Using Tangzhong in bread makes it soft, and retains moisture, bread does not get crumbly after a few days and it also increases the shelf life.


A small part of the yeast bread recipe’s flour and liquid is cooked into a slurry. This is then added to the remaining ingredients. Typically, tangzhong calls for using 6% of the flour and 45% of the liquid in the slurry. Cooking the slurry into a paste pre-gelatinizes the starches in the flour. This means that the dough will now absorb more water. Tangzhong, distributes itself throughout the dough during kneading. It keeps the bread soft and fresh.

We made regular bread rolls with a teaspoon of ground cinnamon and finely chopped homemade candied orange peels. Sweet buns with spicy tones of ground cinnamon and citrusy notes of the peels made it really delicious. Buns taste amazing with butter.


Japanese Milk Bread Buns

Ingredients

Tangzhong

  • 3 tablespoons water
  • 3 tablespoons milk
  • 2 tablespoons flour
  • Dough
  • 2 ½ cups all-purpose flour
  • 2 tablespoons milk powder
  • ¼ cup unrefined sugar
  • 1 teaspoon salt
  • 1 tablespoon instant yeast
  • ½ -3/4 cup warm milk
  • 4 tablespoons butter
  • 1 teaspoon ground cinnamon
  • 1 teaspoon chopped candied orange peels

Instructions

  1. To make the tangzhong, mix all the ingredients in a saucepan. Make sure there are no lumps.
  2. Cook on low heat whisking constantly. Cook till the mixture is thick and the whisk leaves lines on the pan. Let tangzhong cool.
  3. For dough, mix all the ingredients except candied peels add all the tangzhong and knead a soft and elastic dough. Start kneading with ½ cup milk and add more only if needed.
  4. Shape the dough into a ball and transfer to a greased bowl. Turn it around so that it is evenly coated with oil. Cover and keep in a dry warm place to rise for 60-90 minutes or until almost double.
  5. Deflate the dough and sprinkle chopped candied peels evenly on the dough. Let dough rest for 20 minutes.
  6. Grease one 9-inch round cake pan.
  7. Divide into 10 pieces. Roll each piece into a ball. Arrange the rolls in the pan. Cover and let the rolls rise for 40-60 minutes or until puffy.
  8. Bake in a preheated oven at 180 degrees C for 20-25 minutes.
  9. Remove the rolls from the oven. Let them cool in the pan for 10 minutes. Transfer to the rack to cool completely.
Linking to  #BreadBakers

The theme for the event this month is baking with Tangzhong. Our host this month is Karen from Karen's Kitchen Stories. Her blog has an amazing collection of breads.


#BreadBakers is a group of bread loving bakers who get together once a month to bake bread with a common ingredient or theme. Follow our Pinterest board right here. Links are also updated each month on this home page. We take turns hosting each month and choosing the theme/ingredient.


 Dalgona Coffee Vanilla Cupcakes have a delicious combination of coffee and vanilla. The cupcakes are moist and delish and make a great teatime treat. 


The Sun rises early in the hills. As it climbs up, the East part of the hill gets illuminated with its rays. Every tree wears gold and the Poplar tree becomes a giant chandelier as its leaves twist and twirl in the morning breeze. A great Barbet screams and dives down into the valley and disappears into the other side of the hill where the Sun has not yet reached and is dark, grey and cold.

Our morning walk comes to an end as we reach the outer periphery of our fields. A pair of Striated Laughing Thrush are huddled together on a branch of the pear tree.  The pair croons softly and sweetly.


Back home, daily chores begin. An energizing morning walk gives a good start to the day. In the second half, we made Dalgona coffee and vanilla cupcakes.


Dalgona coffee took the food world by storm last year. Our favourite beaten coffee got so much attention and popularity that every coffee lover made it hot or cold or used it in some avatar.


We used it in our favourite Eggless  Vanilla Cupcakes.

The cupcakes get a brown coffee top that goes very well with vanilla.


 Dalgona Coffee And Vanilla Cupcakes (Vegan)

Ingredients

  • 2 teaspoons coffee
  • 4 teaspoons sugar
  • 1-1 ½ teaspoons water
  • 1 ½ cups all-purpose flour
  • 1 ½ teaspoon baking powder
  • ¼ teaspoon baking soda
  • 1 pinch salt
  • 1 cup unrefined sugar
  • 1 cup plant-based milk (room temperature) or milk for a non vegan version
  • 1 tablespoon apple cider / white vinegar
  • 1/3 cup neutral oil
  • 2 teaspoons vanilla extract

Instructions

  1. In a large mug, take the coffee powder, sugar and add water. Beat till creamy, pale and thick. Keep aside.
  2. In a large bowl, whisk together all the dry ingredients. Keep aside.
  3. In another large bowl, take milk, add vinegar. Stir and keep for 5-8 minutes.
  4. Add oil and vanilla extract to this mixture and mix well.
  5. Preheat oven to 180 degrees C. Oil one 12 cavity cupcake tray or line them with paper liners. Or, take 12 silicone cupcake moulds.
  6. Add the dry ingredients to wet ingredients and mix until well incorporated.
  7. Fill up ½ of the prepared cupcake moulds with the batter.
  8. Now add beaten coffee to the remaining batter. Mix well to get a batter of uniform consistency.
  9. Add the coffee batter on top filling the mould to ¾ of its capacity. We have vanilla batter in the bottom and coffee batter on top.
  10. Bake for 20-25 minutes.
  11. Cool in the rack. 

 Spicy Onion Buns are a perfect bake for cold rainy days. Warm garlicky buns with spicy tones taste heavenly with just butter. Spicy Onion Buns make a great accompaniment to a cup of hot soup


Our rendezvous with clouds, fog, rain and rainbow continues for the third consecutive month. Rain falling in a rhythm on soft grass, on green ferns, through leaves, on the forest, on the pond, on the roof feels like a lullaby. It is monotonous, sonorous and soothing. Rain is a balm for the soul.


Clouds of myriad hues look like blotches of paint on the sky, seeping into each other, creating shades and tints that are magical. Sometimes, the Sun peeps through the gaps in the clouds, filling up a patch of the forest in chequered light.  A huge rainbow after a downpour definitely becomes a show stopper making us run out with our cameras to capture its beauty. Monsoon is magical and mesmerizing.


On wet and cold days, the heart craves to have something, spicy and savoury that would compliment a cup of hot soup. 


Spicy Onion Buns are a perfect bake for rainy days. Warm buns with spicy tones taste heavenly with butter. The buns make a great snacking option too.


One can adjust the spiciness according to preference. The buns fill up the home with a heavenly aroma while baking.


Spicy Onion Buns (Vegan)

Ingredients

  • 3 tablespoons oil
  • ¼ cup minced onions
  • 2 tablespoons minced garlic
  • 3 ½ cups all-purpose flour
  • 1 ¼ teaspoon salt
  • 1 -2 tablespoons Italian spice mix
  • 1-2 teaspoons chilli flakes
  • 1 green chilli chopped finely (optional)
  • 1 ¼ cup warm water
  • 2 tablespoons unrefined sugar
  • 2 teaspoons instant yeast
  • 2 tablespoons plant-based milk/milk (non-vegan version)
  • 2 tablespoons poppy seeds

Instructions

  1. Heat oil in a wok. Add onions. Sauté until the onions turn translucent.
  2. Add minced garlic. Sauté for another 3-4 minutes. Turn off the heat.  Let the mixture cool.
  3. Whisk together flour, salt, spice mix, chilli flakes, chopped chillies in a large bowl.
  4. Add fried onions and garlic. Mix well.
  5. Add sugar to warm water. Stir. Add yeast. Stir. Cover and keep for 10 minutes or until frothy.
  6. Add this mixture to the bowl with flour mixture. Knead for 8-10 minutes to get a very smooth and soft dough. Add more water if the dough feels tight or hard.
  7. Transfer the dough to an oiled bowl. Cover and keep in a warm place to rise for 1 hour.
  8. Line a baking tray with a parchment sheet. Preheat oven to 180 degrees C.
  9. Punch the dough and knead for 2-3 minutes. Cover and let rest for 5 minutes.
  10. Pinch out small pieces of dough and shape them into buns.
  11. Place on the baking tray keeping enough distance as the buns will expand and rise.
  12. Cover and keep in a warm place for 30-45 minutes or until double.
  13. Brush the top with milk. Sprinkle poppy seeds.
  14. Bake for 20-25 minutes or until the top turns golden.
  15. Cool on the rack. Enjoy warm buns with butter.


We baked the same buns with Whole Wheat flour.


Whole Wheat Spicy buns are soft, fluffy, very flavoursome and delicious. It makes lovely snacks for kids. It is nutty, substantial and filling. It is tastier than the regular buns.


Whole Wheat Spicy Buns (Vegan)

Ingredients

  • 4 tablespoons oil
  • ¼ cup minced onions
  • 2 tablespoons minced garlic
  • 3 ½ cups whole wheat flour
  • 1 ¼ teaspoon salt
  • 1 -2 tablespoons Italian spice mix
  • 1-2 teaspoons chilli flakes
  • 1 green chilli chopped finely (optional)
  • 1 ½ - 1 ¾  cup warm water
  • 2 tablespoons unrefined sugar
  • 2 teaspoons instant yeast
  • 2 tablespoons plant-based milk/milk (for non vegan version)
  • 2 tablespoons poppy seeds


If you want really soft buns, then I recommend that you go for overnight autolyse. Mix flour and salt mentioned in the recipe, add sugar to warm and make a dough that is neither too tight nor too soft. Cover and keep in the refrigerator overnight. Take it out in the morning and let it come to room temperature. Add some drops of water to yeast to get a paste. Add to the dough. knead for 2 minutes. Now add spice mix, chilli flakes, chopped chillies and fried onions and garlic. Knead to get a smooth dough.

If you find autolyse method cumbersome, you may avoid it.

Follow the instructions as above.


Linking to #Breadbakers

BreadBakers

 #BreadBakers is a group of bread loving bakers who get together once a month to bake bread with a common ingredient or theme. You can see all our lovely bread by following our Pinterest board right here. Links are also updated after each event on the #BreadBakers home page. We take turns hosting each month and choosing the theme/ingredient.

This month's Bread Bakers theme is Spiced Savory Breads and our host is Renu of Cook with Renu


NewerStories OlderStories Home